Quickstart
This guide takes you from a new account to your first Scout answer and your first hunt. Expect it to take about fifteen minutes plus whatever your data source needs for credentials.
Prerequisites
- A Huntbase account. Sign up or accept an invitation from a teammate.
- Credentials for at least one product you want to query (an API key, OAuth access, or a service account, depending on the product).
- A current browser (Chrome, Firefox, Safari, or Edge).
Step 1: Sign up and complete onboarding
Create your account at app.huntbase.io/auth/sign-up. Huntbase sends a confirmation link to your email — open it from the Check your inbox screen to verify your address.
The first time you sign in, a Before you continue dialog asks you to review and accept the Terms of Service and the policies linked beside it. Tick the box and click Accept & continue. The product-updates checkbox below it is optional. If you choose Decline & sign out, you can't use Huntbase until you accept.
Huntbase then walks you through a short setup wizard. A progress bar at the top shows where you are; you can go Back at any step.
- Welcome to Huntbase — Click Get started.
- Create an organization — Huntbase accounts work inside an organization, so you create one here even if you are the only member for now. Click Get started. If you have pending invitations, they are listed on this screen and you can join one of those organizations instead.
- Create your organization — Enter an Organization name. If you already belong to organizations, you can pick one under Your organizations.
- Choose your plan — Pick a plan for the organization. You can change plans later.
- Invite your team — Organization admins only. Add email addresses now, or invite later from Settings.
- Add your connections — Pick a source to connect, or choose Skip for now — set up later in Connections.
- Time for your first run — Choose Run a Query to pick a query template and open it in Explorer, or Start a Hunt to open a new hunt with Scout. Or click I'll explore on my own.
When you finish, you land in Explorer, Huntbase's home.
Some Huntbase deployments also offer a personal path at step 2: a Who is this for? screen where Just for me skips the organization steps and For my team continues as above. Sign-ups at app.huntbase.io always create or join an organization.
Sign-up, sign-in, password reset, and multi-factor authentication happen on Huntbase's own sign-in pages. You return to the app automatically when you are done.
Step 2: Connect a data source
Scout can only answer questions about data it can reach. There are two ways to give it some, and either is enough to get started:
- Connect a source we query — a SIEM, an EDR, a cloud account, or an Apache Iceberg lake you already own. Steps below.
- Send us telemetry — no store of your own needed. On the Connections page, use Send telemetry to Huntbase to mint an ingest key; it generates the config for Fluent Bit, Vector, rsyslog or syslog-ng. See Data lake.
To connect a source:
- Open Connections from the navigation.
- Click New connection.
- Pick your product from the grid. The right-hand rail lists what you need to fetch from the vendor first — which kind of token, and what it needs access to.
- Name it, choose which organization owns it, then fill in where it lives and the credential.
- Click Create & check. The connection is created and checked straight away; if the check fails you can fix the details, try again, or discard it without leaving the page.
Don't have the credential to hand? The page keeps your progress in its address, so you can close it and come back, or send the link to whoever does.
If your source is a fleet of endpoints rather than a SaaS product, set up Endpoint Control instead. If your data already lives in a data lake, or you would rather ship logs than expose a store, see Data lake. Otherwise Connections and Endpoint Control have the full walkthroughs.
If you see Request access where you expected ingest keys or Endpoint Control, that capability has not been switched on for your organization yet — see Data lake and Endpoint Control for what the request does.
Step 3: Ask Scout your first question
Back in Explorer, the home tab shows a launcher with an Ask / Query toggle above it. Leave it on Ask.
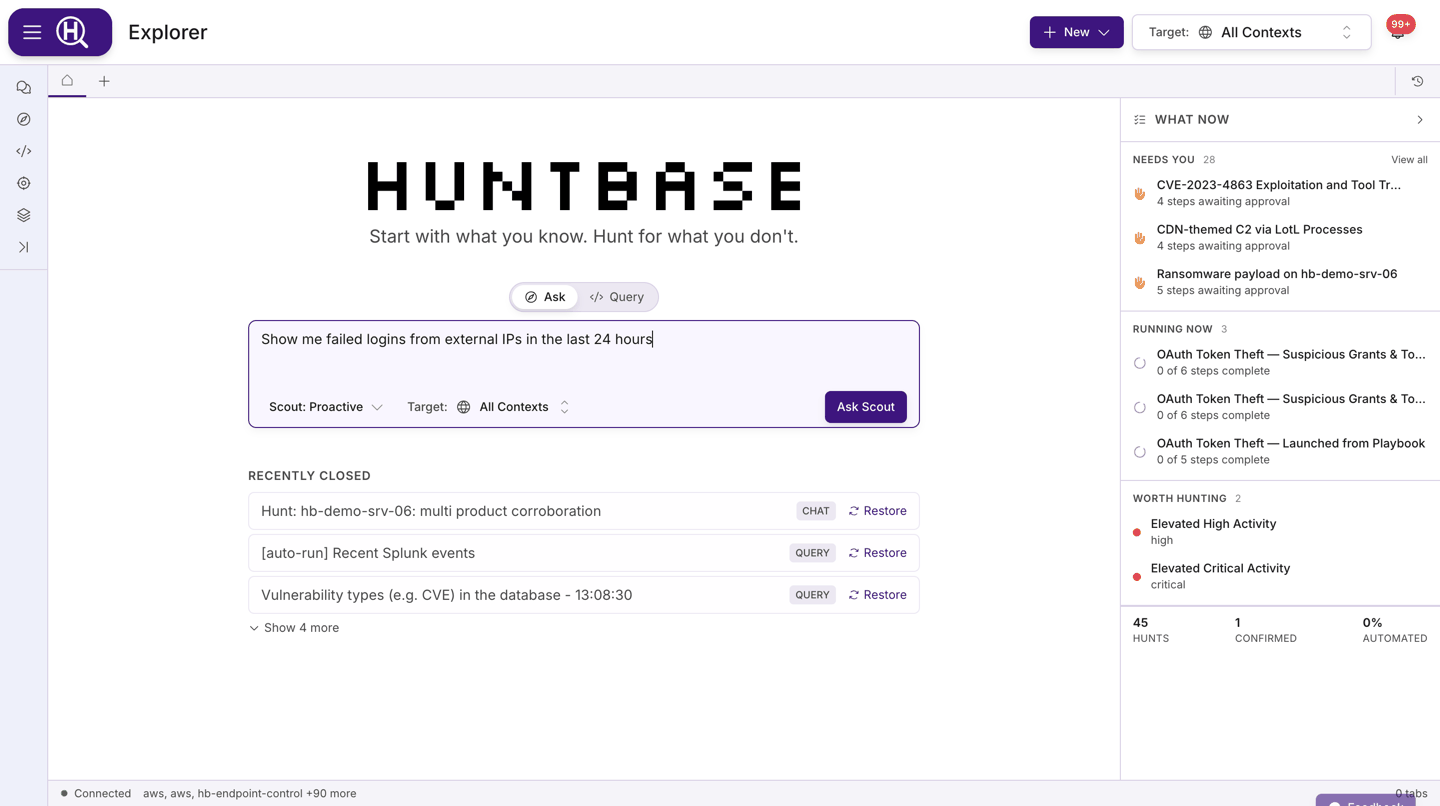
- Type a question in plain language, for example:
- "Show me failed logins in the last 24 hours."
- "Which hosts talked to a newly registered domain this week?"
- "List users who were added to an admin group in the last 7 days."
- Optionally set how much initiative Scout should take using the selector under the input: Ask first, Balanced, or Proactive (the default). Huntbase remembers your choice for new chats.
- Press Enter or click Ask Scout.
A new chat tab opens. Scout shows its reasoning as a series of steps, works out a query, picks connections, and runs it. Depending on your initiative level it may first ask a clarifying question or show a confirm execution card where you can review and edit the query before it runs.
You can also type /query at the start of the input to switch the same box into Query mode, or /knowledge to search your knowledge sources. See Chatting with Scout.
Step 4: Open the results in a query tab
When the run completes, Scout posts a Scout Analysis card with the row count, a summary, and key findings, followed by follow-up queries and hunt ideas. Click See Results on the execution card to open the run in a query tab in Explorer.
In the query tab you can read the results table, edit the query and run it again, change the time window and connections, and save the query as a template. See Query workspace.
Step 5: Look at entities and insights
Scout and the query workspace pull entities (hosts, users, IPs, domains, hashes, CVEs and more) and insights (findings) out of results.
- Entity and insight cards appear in the chat when Scout mentions them.
- Selecting an entity in a query tab opens the side panel with Information and Relationships tabs, showing details, tags, provenance (which run and query found it), related queries, and a relationship graph.
- Insights show a review state (Needs review, Approved, Hunt started, or Dismissed) that your team updates as it works through them.
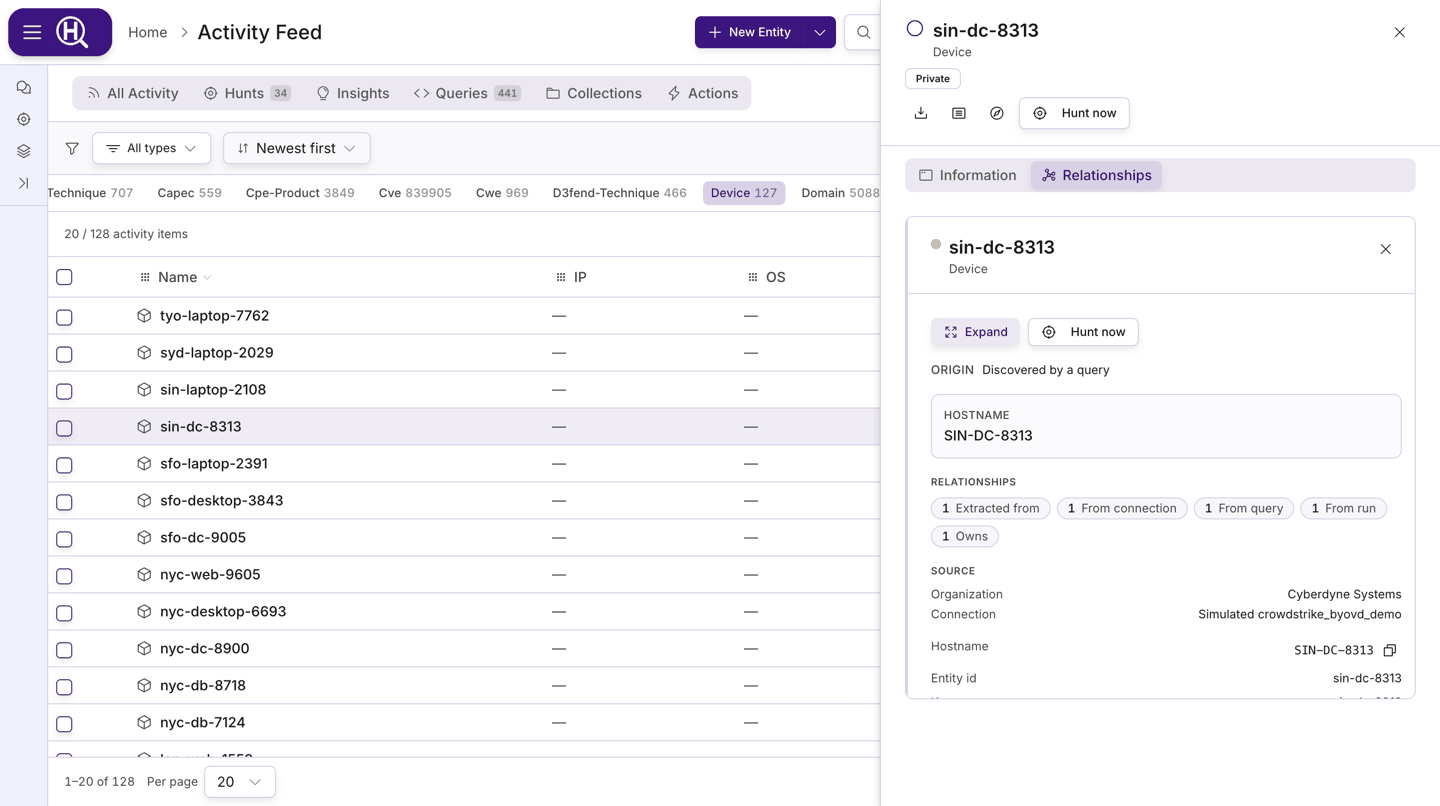
The Activity Feed collects everything the team has produced across hunts, insights, entities, and queries. See Entities and Insights.
Step 6: Start your first hunt
When a question turns into an investigation, promote it to a hunt so the steps, findings, and report are kept together.
- In a chat, when Scout offers a Hypothesis Draft, click Start hunt. Scout creates the hunt from the conversation and posts a Hunt session created card; Show hunt opens it beside the chat.
- From an entity panel, click Hunt now to start a hunt seeded with that entity.
- In the dock's Workspace view, click New hunt (+) for a blank hunt.
The hunt opens on its notebook. Type what you are hunting in the Subject or hypothesis cell, then pick a door: Have Scout plan it, Write a query, or Add from Library. Choose how much Scout does on its own — Guide, Collaborator, or Operator — approve checkpoints as they appear in Needs you, and record a verdict in the last cell when you know the answer. See Hunts.
Where to go next
You now have a connection, a chat, a query tab, and a hunt. From here:
- Browse the Library for hunt playbooks and query templates you can run without writing anything.
- Set up Watchers so new insights start hunts or notify you automatically.
- Check Pulse after a week to see what your hunting has produced.
Next steps
- Key concepts — the vocabulary the rest of these docs use
- Explorer overview — tabs, deep links, and the command palette
- Hunt playbooks — launch a ready-made hunt
- Watchers — standing rules that raise findings and start hunts automatically