Personal settings
Settings › Personal holds everything that belongs to you rather than to an organization: your profile and sign-in security, personal tag folders, and invite links for friends. Open it from the navigation menu via User Profile.
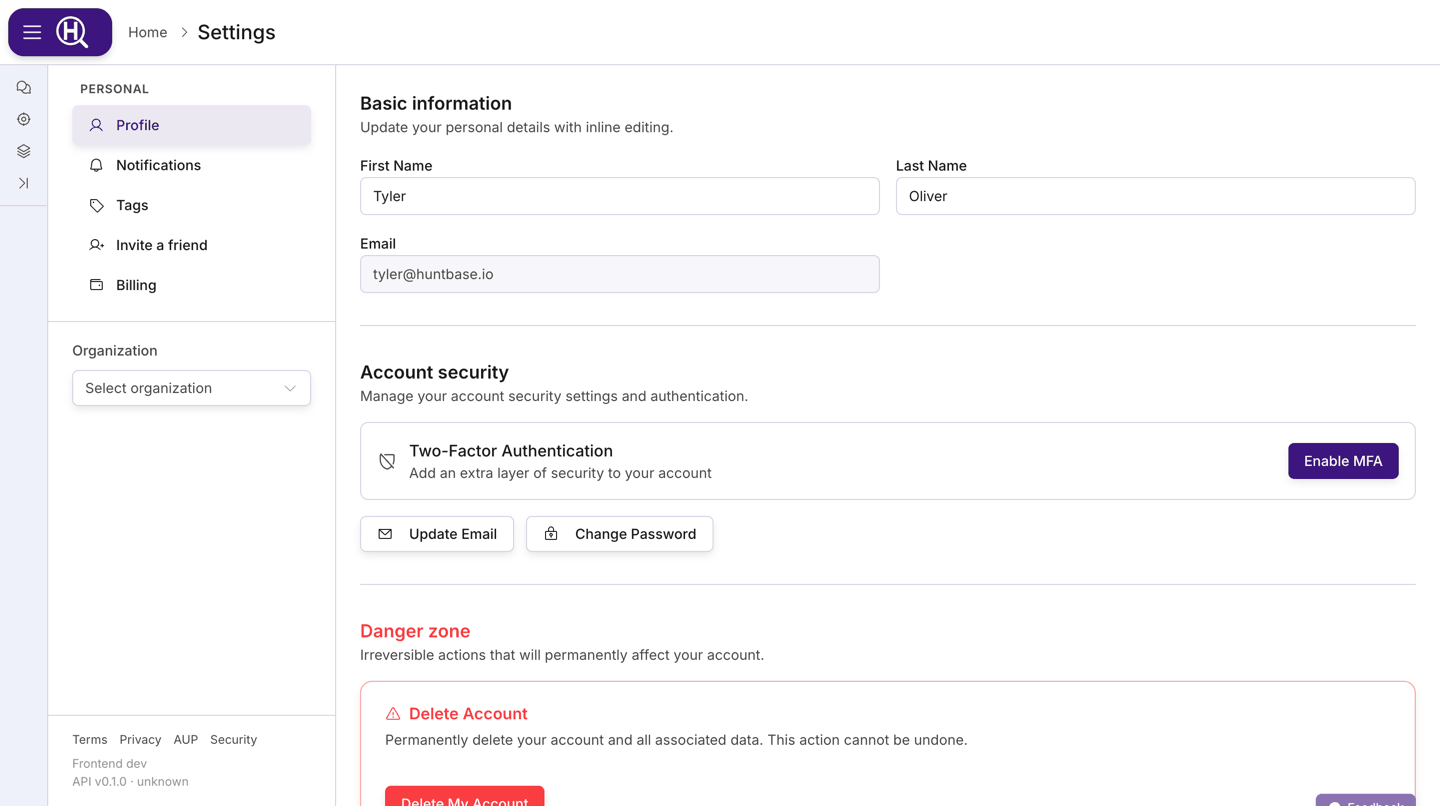
Profile
The Profile section has three parts.
Basic information
- First Name and Last Name — click a field to edit it inline and save. Each change is confirmed with a toast.
- Email — shown read-only here. Change it with Update Email below so the new address can be verified.
Account security
| Control | What happens |
|---|---|
| Enable MFA | Opens the Enable Two-Factor Authentication dialog. Scan the QR code with an authenticator app (or use Trouble scanning? Switch to text code to copy the secret instead), enter the 6-digit Verification Code, and click Enable MFA. |
| View Backup Codes / Disable MFA | Shown once 2FA is on. Backup codes let you sign in if you lose your authenticator; Disable MFA asks for confirmation first. |
| Update Email | Opens Update Email Address. Enter the New Email Address and Confirm Password. You then verify the new address by email before it takes effect. |
| Update Password | Opens Update Password. Enter your Current Password and a New Password. |
Organizations can require 2FA for all members, optionally by a deadline. If your organization has turned that on, enable MFA here before the deadline to keep access.
Danger zone
Delete My Account permanently deletes your account and its data. You are asked to confirm twice; the action cannot be undone. When it completes you are returned to the sign-in page.
Accounts managed by SSO
If your account comes from your organization's SSO/SAML provider, Basic information is read-only and the Account security controls are hidden. Update your name, email, or password through your identity provider or ask your organization's administrator. Account deletion is still available.
Signing in
Huntbase supports these sign-in methods:
| Method | Notes |
|---|---|
| Email and password | Create an account on the Create an account page and verify your email (Check your inbox) before first sign-in. |
| Continue with Google | Available when enabled for your deployment. |
| Continue with Microsoft | Available when enabled for your deployment. |
| SSO / SAML | Configured by your organization. |
- If 2FA is enabled, you are prompted for Two-factor authentication after entering your password. Enter the code from your authenticator, or click Switch to backup code and enter one of your backup codes.
- Use Forgot password? on the sign-in page to request a reset email, then set a New password and Confirm new password from the link.
Accepting the terms
The first time you sign in (and whenever the terms change) a Before you continue dialog asks you to accept the Terms of Service, Privacy Policy, and Acceptable Use Policy. Tick the checkbox and click Accept & continue. Decline & sign out signs you out without accepting; you cannot use Huntbase until you accept.
Tags
Settings › Personal › Tags manages your Personal Tags: tag folders visible only to you, for organising your own hunts, sessions, and queries without affecting team views. Organization-wide folders are managed separately by admins under Settings › [Organization] › Tags.
What you can do here:
- New folder — opens New tag folder. Give it a Folder name (a slug is generated automatically and can be edited) and an optional Description. If more than one scope is available to you, choose who can see it.
- Expand a folder to add tags with the New tag name… field, pick or change a tag's color, and delete individual tags.
- Delete a folder. The Delete folder? dialog warns that all tags in the folder and their existing assignments are removed; this cannot be undone.
Tags you create here appear in tag pickers across Huntbase when your personal scope is selected.
Invite a friend
Settings › Personal › Invite a friend lets you share Huntbase with people you know using unique invite links.
- Click Create invite to generate a new link. It is copied to your clipboard immediately.
- The page shows how many invites you have left as N of M invites remaining. The limit is set by Huntbase and shown on the page; each link expires after 7 days.
- Each invite row shows its status — pending, accepted (with the accepting email), or expired — and, while pending, a copy button and a Revoke invite action.
- The person opening the link lands on an invite page and can choose Create account and accept or Sign in and accept. If the invite was bound to a specific email, they must use that email.
Friend invites bring someone into Huntbase. To add someone to an organization, use Invite Member under Settings › [Organization] › Members — see Organization management.
Next steps
- Settings overview — how the Settings sidebar and Target selector fit together
- Notifications — choose channels and categories
- Organization management — create an organization and invite members